How to open a current account in 1s 8.3.
– a modern accounting tool that allows you to register a variety of transactions, including such as the receipt of money into a bank account or debiting from it.
First of all, you need to fill in the details of the current account (or several accounts) of our organization. To do this, use the “Bank Accounts” tab in the form of information about the organization:
The settlement accounts of counterparties who will transfer money to us and to whom we will transfer money must also be filled out. They can be filled out in the directory "" or directly in the bank documents of the program.
As a rule, modern banking transactions are carried out via an Internet connection using programs such as “Bank-client”. At the same time, ready-made bank statements are loaded into the 1C database. In 1C you only need to fill out payment orders. However, the program allows you to create banking transaction documents manually.
Let's look at what it looks like in 1C: Accounting to write off and receive money through a bank.
Debiting funds from a current account in 1C 8.3
- Usually, the document “ Payment order" It does not make accounting entries, but serves to transmit information to the bank that a transfer needs to be made from our bank account to the recipient’s account. To view or create a payment order, you need to go to the “Bank and Cash Desk” menu section (Bank – Payment orders).

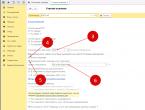
The image shows that the document has a “Type of operation” field. The details and processing of the document itself depend on the choice of value in it. By default, the “Payment to supplier” type is automatically set; if necessary, you can select another.
The payment order must indicate such data as the recipient (counterparty) and his account, type and priority of payment, amount and purpose of payment. If there are several organizations or several current accounts, you should select an organization and its account. For types of transactions reflecting settlements with counterparties, indicate the agreement and the VAT rate.
Please note that the type of contract must correspond to the type of transaction:
- for “Payment to the supplier” you need an agreement “With the supplier”;
- for “Return to buyer” – “With buyer”.
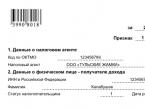
The “Payment ID” field is used to indicate the UIN if necessary. If accounting is configured in the program, then in the payment order (as in all “monetary” documents) there will be a field “DDS Article”, which should also be filled out.
Get 267 video lessons on 1C for free:
In the document, the details of the organization and the counterparty are displayed as links; by clicking on these links you can edit the details. In addition, using the “Settings” button, you can configure the display of the name and checkpoint of the counterparty and organization, payment purpose, month, amount.
At the bottom of the document there is a “Paid” flag. It is not recommended to set it manually; this flag is set automatically when registering a payment in the program. The payment order is posted and stored in a journal. An unpaid “payment” can be identified by the absence of a payment mark:

Once completed, the payment order is sent electronically or in printed form to the bank. In 1C, electronic exchange with the bank directly from the program is possible, but this requires preliminary setup, which is performed by a specialist.
- After payment for the order has passed through the bank, the document “ Debiting from current account" When executed, this document is created automatically after loading data from the bank. Otherwise, you need to enter it manually. The most convenient way to do this is from the payment order for which we want to reflect the payment: you need to open the “payment” and in it click on the link “Enter a debit document from the current account.”
A new document “Write-off from the current account” will be automatically created, completely filled out on the basis of our payment order. However, all details can be changed.

The accounting account is filled in by default - this is the accounting account for funds held in the organization's current accounts.
The account for settlements with the counterparty and the advance account are set automatically based on the type of transaction. During the document posting, the program itself will decide whether this payment is an advance (by analyzing the calculations under the contract), and will make the appropriate posting.
The “Debt repayment” attribute determines the algorithm for analyzing settlements with the counterparty. If instead of “Automatically” you select “By document”, you will need to select a settlement document.
When posting, an accounting entry is made to write off funds from the current account according to the document transaction type and settings.
After the “Write-off from the current account” has been carried out, the “Paid” flag is automatically set in the original payment order and a link to the write-off document appears:
A payment note also appears in the payment order journal.
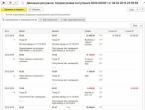
The entered debit document from the current account is saved in the journal, which is accessible through the “Bank and cash desk” section (Bank - Bank statements).

The program allows you to enter “Write-off from your account” directly in the journal of bank statements using the “– Write-off” button without first completing a payment order.
Receipt of funds to the current account
To register this operation in 1C 8.3, use the document “Receipt to current account”. As a rule, it is loaded into the program in finished form when exchanging with the bank. Manual entry of a document is available from the same journal “Bank Statements” by clicking the “+ Receipt” button.
Just like the write-off document, “Receipt to the current account” has the “Type of transaction” field, the filling of which determines the details and parameters of the document. The remaining data is also similar to the write-off document: accounting account, counterparty (in this case, he is the payer), amount and purpose of payment, and also, depending on the type of transaction of the document and the settings, agreement, VAT rate, settlement accounts, . If the document reflects payment from the buyer on a previously issued invoice, then you can select it in the “Invoice for payment” field.
Usually, working with bank statements is configured automatically through the client-bank system, but the ability to integrate client-bank and 1C is not always possible. In this case, work with the bank will have to be done manually. Let's look at how the necessary documents are generated.
Creating a payment order
In order to transfer money from an organization’s current account to pay suppliers, pay taxes and other fees, you need to create a payment order. On the “Bank and cash desk” tab, select the “Payment orders” item:
A list of payment orders opens. In the upper left part of the document, click the “Create” button, a form for a new payment order opens. The following fields are filled in:
- Transaction type – selected from the proposed drop-down list according to the type of payment being made;
- Recipient – the required counterparty is selected from the counterparty directory, the recipient’s account and the agreement are filled in automatically from the counterparty’s details;
- Amount of payment;
- VAT – by default it is set from the counterparty’s data;
- VAT amount is calculated automatically;
- Purpose of payment.
It is important to correctly indicate the type of operation, since depending on the selected operation, the document details will change.
For example, when choosing the type of transaction “Payment of tax”, you will need to fill out the “Type of obligation” field, you can change the BCC and OKTMO code (by default they are filled in with current data). The order for payment to the supplier looks like this:
After completing a completed order to pay the supplier, no transactions are generated in 1C; it is just an information document that records the need to generate a similar payment order in the client-bank system (remember, we are talking about manual work).
Another way to create a payment order manually is through the “Pay” button, which, like the “Create” button, is located above the list of payment orders. When you click, a list opens from which you can select the desired type of payment: “Accrued taxes and contributions” or “Goods and services”:
When you select one of the items, it will analyze the organization’s debt and generate a list of documents that require payment:
To create payment orders to several creditors at once, you can mark the required documents in the list and click the “Create payment orders” button.
New payments will appear in the list. They are in bold and not posted because they need to be verified. After checking the correctness of filling and the correctness of the amounts, the order is carried out. In this case, you also need to duplicate the order in the client-bank system.
As soon as the bank has confirmed that this payment has been transferred to the recipient, the movement of funds in the accounts must be reflected in 1C and debited from the organization’s current account.
You can debit your current account from the same payment order. In it you need to set the status to “Paid” and click on the hyperlink “Enter a debit document from the current account.”
The document “Write-off from the current account”, unlike a payment order, generates transactions in 1C.
You can see the transactions by clicking the “Show transactions” button:
Everything was filled out correctly: funds were transferred from the organization’s current account to the supplier’s current account, which is reflected by posting Dt60.01 - Kt51. In the list of payment orders, a check mark appears in the first column opposite paid documents:
Receiving payments from buyers
To reflect the receipt of funds to the organization’s current account, use the “Bank statements” item in the “Bank and cash desk” section:
When you select this item, a journal opens that reflects all receipts and debits from the current account:
To enter information about receipt, use the “Receipts” button. The document “Receipts to the current account” opens, in which the following fields are filled in:
-
The VAT rate, agreement and movement item of the DS are filled in from the previously established values.
Type of transaction – in our case, “Payment from the buyer” is set;
Payer – the counterparty from whom the money came is selected from the directory;
After filling out all the data, the document is posted:
Once done, you can check the wiring:
Posting Dt51 - Kt62.02 shows that money has been received from the buyer to our account.
The list of bank statements shows current information on the current account status for the current day:
Information is provided on the amount at the beginning of the day, on receipts and write-offs for the day, and the balance at the end of the day.
If you need to clarify information for any other day, you can use the calendar to select the desired date:
A list will be generated for the selected day, which will also show all information about the account status.
Register of documents
To obtain summary information on transactions on a bank account, use the “Register of Documents” report; the button of the same name for creating it is located in the journal of bank statements. After clicking the button, a document is generated for printing:
An already completed document is created; all that remains is to post it after verification:
The counterparty's debt for this sale is extinguished, and the receipt automatically falls into the sales subordination structure:
Payment orders are issued in a similar manner based on purchases and receipts of services.
Checking the status of your current account
You can check the status of your current account both in the journal of bank statements and through the “Start Page” on the main page of 1C:
Also, to check the account, you can use the balance sheet for the account (51 accounts for ruble transactions, 52 for foreign currency transactions).
On a note: If the recommendations below are not clear to you, and you need to configure it, then I recommend contacting us - Smart1C.ru. We will quickly configure the bank client for any 1C configuration.
All settings for exchange with a bank in the 1C: Accounting 8 program are placed on a single form. In order to set up the exchange of data on a bank account with the Client-Bank program, in the 1C: Accounting 8 program (rev. 3.0) perform the following steps:
For your information- for individual full-fledged work on the trading market, I recommend using the free Forex program. The program implements charts and contains economic market reviews necessary for analysis and decision-making.
In the program “1C: Accounting 8”, to reflect the payment received, the document “Receipt to the current account” with the transaction type “Payment from the buyer” is used, and to reflect the payment, the document “Write-off from the current account” is used. All these documents can be viewed by clicking on the menu tab - “Bank and cash desk” - “Bank statements”.
At this point, the client-bank settings from the Accounting 3.0 side are completed. All that remains is to work in it correctly, performing the exchange - loading/unloading.
The principle of working with a client bank comes down to the following actions:
- Open the processing “Exchange with the bank” - “Bank and cash desk” - “Bank statements” - the “More” button - “Exchange with the bank”;
- When you receive payment from the supplier, you export the file from the client bank to 1C - “Exchange with bank” - “Download bank statement” - “Download” button, the document “Receipt to the current account” automatically appears;
- If you need to pay a supplier, you create a new counterparty in the “Counterparties” directory, enter their “Bank Accounts” data, then in the program create a new document “Write-off from the current account” with the transaction type “Payment to the supplier”, post it, export this document from 1C programs - “Exchange with the bank” - “Send to the bank” - “Unload” and import into the Client Bank. Thus, you will have a 2-way exchange: 1C programs and Client-Bank.
Video - Client bank in 1C 8.3 setting up, uploading and downloading statements
How to set up loading of bank statements in 1C, as well as uploading, and how to make a statement in 1C 8.3?
Let's start by creating a payment order:
- Based on the document of receipt of goods and services, invoices, etc.;
- Through the creation of a new payment order/PP.
In the “Bank and cash desk – PP” block.
Fig.1
A journal with payments will appear in the window that opens, where you can, by setting up the appropriate selection, filter the necessary documents, for example, display a list by a specific organization, bank account, date or counterparty.

Fig.2
Filling out the main fields here begins with the “Type of operation”. Depending on what is selected, the structure of the document will change, as well as the required analytical fields.
Having filled out the basics, we open and close the document with the “Post and Close” button.

Fig.3
The payment system does not make any transactions in 1C 8.3; they are generated by “Write-off from account”, which can also be created based on the payment slip we generated, or manually, by creating a new write-off.
Creating a receipt/debit from a current account
The first option is to create it manually through the “Bank and cash desk – Bank statements” block.
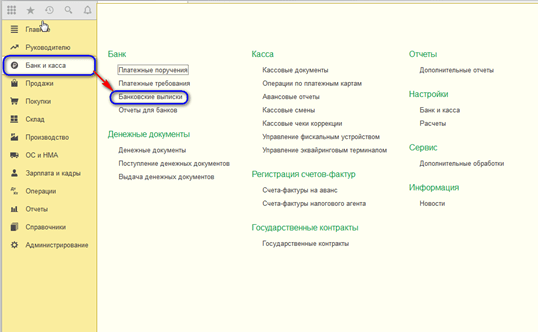
Fig.4
The journal that appears shows all receipts and debits from the account. To make it more convenient to work with it, you can set filters:
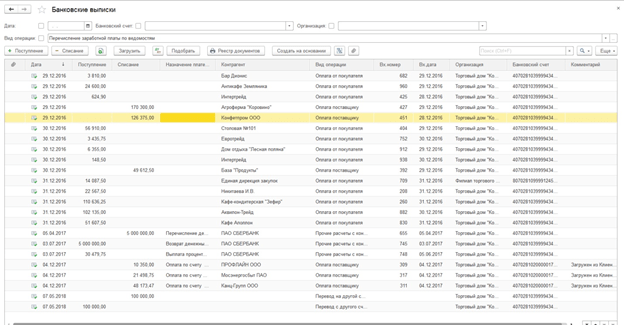
Fig.5
To make the document we need, click on “Receipt” or “Write-off”, depending on what we need.
Fig.6
Here we fill out the main fields in the same way as filling out a payment order:

Fig.7
After filling out all the fields, check the correctness of the filled in details and click “Record-Post”.
In the documents “Receipt to the current account” and “Write off from the current account” we look at the transactions and check the correctness of their display through the “DtKt” button. The transactions will be displayed in the “Document Movements” window that opens.

Fig.8
After checking the correctness of the transactions, click “Post and close”.

Fig.9
The second way to create “Receipt to current account” and “Write off from current account” by uploading a bank statement
Let's move on to sending documents to the bank. While in the “Bank Statements” journal, click “MORE—Exchange with the bank.”

Fig.10
In the “Exchange with Bank” window that opens, to upload documents to the client bank, select the “Send to Bank” tab:
- We select the company from which we will upload documents;
- We indicate the bank account;
- We select the period for which we need to download the bank statement;
- Select the location to upload the file.

Fig.11
The tabular part here will be filled with bills that need to be paid.
Next to each payment card that we want to pay, we put a “Flag” and click on the “Upload” button. This will open the “Check for virus attacks” window, where we click “Check”.

Fig.12
A file will be generated in the “1c_to_kl.txt” format, which must be uploaded to the client bank.
In the “Exchange with Bank” window, you can view a report on uploaded payment documents, for which click “Upload Report”. The resulting report will display the payments that were uploaded to a file for downloading to the “client bank”. It can be saved in any format or printed.

Fig.13
Loading an extract in 1C 8.3
The first option is from the “Download bank statement” tab.

Fig.14
We indicate:
- Organization
- Bank account
- Download file
Click on the “Update from statement” button.
The tabular part will be filled with data from the file, while the lines highlighted in red mean that the program did not find in the directories the data (registration account, counterparty by matching TIN and checkpoint) to which receipts or write-offs from the account should be distributed. Correctly distributed documents are highlighted in black.
Next to each document that we want to upload, we put a “Flag”. At the bottom of the window, information will be given on the number of documents to be loaded, as well as “Total Receipts/Debits for the amount”. Click “Download”.
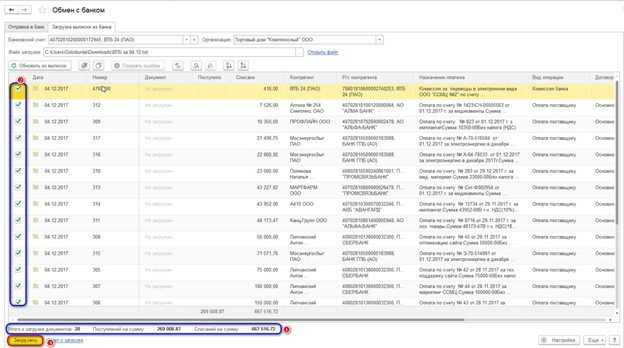
Fig.15
If the bank statement in 1C 8.3 was partially downloaded, the system will display this information in the tabular part of the “Exchange with Bank” window. Documents that have not been downloaded will be displayed with the value “Not downloaded” in the “Document” column; for downloaded documents, the information “Debit from the current account or Receipt to the current account”, the number and date assigned to it will be displayed.

Fig.16
You can view a report on downloaded documents. To do this, click on the “Download Report” button.

Fig.17
Let's consider the second option, how to load statements into 1C 8.3.
In the “Bank Statements” journal, click “Download”.

Fig.18
Here we look for the extract download file and click “Open”.

Fig.19
The program will automatically download and post documents from the statement and display the number of downloaded documents, as well as the total receipt amount and the total write-off amount.

Fig.20
Documents in the Bank Statement journal, marked with a green flag, are posted and posted.

Fig.21
You will need to post and post the statement yourself if it is not marked with a green checkmark: open the document that has not been posted, fill in the basic required fields for posting the document, check the correctness of the filled in details, click on the “Post” button, then “Post and close”.

Fig.22
The document was processed and distributed.
If in the bank statement journal you need to display the initial balances at the beginning and end of the day, as well as the total receipts and write-offs for a given date, click “MORE – Show/Hide totals”.

Fig.23
At the bottom of the journal, the initial balances at the beginning and end of the day will be displayed, as well as the total receipts and write-offs as of the date.
In the 1C 8.3 Accounting program, you can reflect not only the movement of funds through the cash register, but also through the current account of the organization. In this article we will describe in detail all the actions that need to be performed in the program to reflect the debit and credit to the current account.
Before you begin to reflect the movement of funds on your current account, it must be indicated in the program.
Open your organization’s card in the directory of the same name and follow the “Bank Accounts” hyperlink. You will see a list of all previously entered accounts. There may be several of them, but only one will be the main one.
When creating a new bank account, you will need to indicate its number, account currency and the bank in which it is opened. You can also specify other data if desired.

Debiting from current account
Payment order
First of all, you need to create a payment order in 1C Accounting. This document is necessary to instruct the bank to transfer a certain amount of money from your account to another.
In the “Bank and cash desk” section, go to “Payment orders”.

A list of previously created documents will open in front of you. For easy searching, various selections are available here. Actually confirmed orders in this list will have the “Paid” mark, which is highlighted in green.
Click on the “Create” button.

First of all, in the created document you need to correctly indicate in 1C 8.3 the type of transaction for writing off funds. It will depend on him what details you will need to fill out. In this example, this is payment to the supplier.

The contract will also be filled in by default with the main contract of the required type. In our case, the type of contract is “With a supplier”. If, on the contrary, we sell a product and go to get money for it, then the contract should look like “With the buyer.”
If provided for in the agreement with the counterparty, then a unique payment identifier is indicated. To reflect this operation in management accounting (if this option is enabled in the settings, as in our example), indicate the DDS item.
The payment amount and VAT rate are set manually. The VAT amount, as well as the purpose of payment, will be generated automatically. The purpose of payment is indicated as the total amount, VAT sum and agreement. If necessary, this field can be supplemented or adjusted.
At the very bottom of the form there is a field to indicate the payment status. It is not advisable to adjust it manually, since it will automatically change after the fact of debiting the funds is reflected in the program.

Subsequently, all payment orders are transmitted to the bank. This can be done in printed or electronic form. Many organizations use the Client-Bank program. It allows you to exchange data with the bank remotely. You can not only instruct the bank to transfer funds from your current accounts, but also receive data on receipts to them.
Debiting from current account
To reflect the fact of debiting funds from the current account, a document of the same name is used in 1C 8.3. It can be created either automatically (upon receiving data from the bank) or manually based on a payment order.
In our case, for simplicity of the example, we chose the second option. The created write-off document was filled in automatically.

The default accounting account is 51 “Current accounts”. In our case, payment is made to the supplier, so the settlement and advance accounts are 60.01 and 60.02, respectively. Of course, this data can be changed. When posting the document, a check will be made automatically to see if our payment is an advance payment.
All other details are filled in from the payment order. We will not change anything here and will pass the document. The document postings are shown in the figure below.

Now let’s return to the list form of the “Payment order” document. As was written earlier, our document automatically changed its status to “Paid”. This can be seen in the corresponding column.

In addition, write-off documents will be displayed in . They can be found in the “Bank and Cashier” section.

Receipt to the current account
This document, like a write-off, gets into the program automatically after it is completed with the bank. In our example, we will consider entering it manually. You can create a document for receipt of a current account in 1C 8.3, as well as a write-off, from bank statements. To do this, click on the “Receipt” button.

The document is practically no different from a write-off. In this case, the type of operation will already be “Payment from the buyer”. Additionally, here you can specify the department and the invoice for payment (if one was issued). If you create a receipt document manually, then you also need to fill in the incoming number and date. When created automatically, this data will already be filled in.

After posting, the document will generate transactions that are shown in the figure below. As you can see, our payment of 80,000 rubles from Anticafe Strawberry was taken into account in the advances account. Just as with write-offs, in this case the program automatically determined this.

See also video instructions about bank statements: